Data entry is one of the important steps in the data analysis process. It is important that the data collected is correctly entered into the electronic format. A good data entry form can reduce the number of human errors added during the data entry. A correctly designed data entry form can speed up data entry and boost productivity. By reducing the errors in data entry, you can get more accurate results. This tutorial will show you how to submit an HTML form to Google Sheets for easy data entry.
Table of Contents
Benefits of having an online data entry form
The data entry forms are even helpful when they are available online. With online forms, you can allow your data entry operators to work from home. You can implement tracking methods to monitor their performance. So, you can do the data entry work more easily and efficiently with online forms.
How to Submit an HTML form to Google Sheets using Google Apps Script’s HTML Service
Google Forms is the most popular online survey tool, which is available for free. However, when it comes to mass data entry works, it is not that supportive. Instead of using Google Forms, you can build your own data entry form with Google HTML Service. With HTML service, you can have your own design, input fields, and validations and save your data to Google Sheet. And also you can embed your form in Google Sites and build your own web app.
This post will show you how you can create the following simple data entry form with Google Apps Script and submit the data to Google Sheets.
Step 01. Create a new Google Sheet on your Google Drive
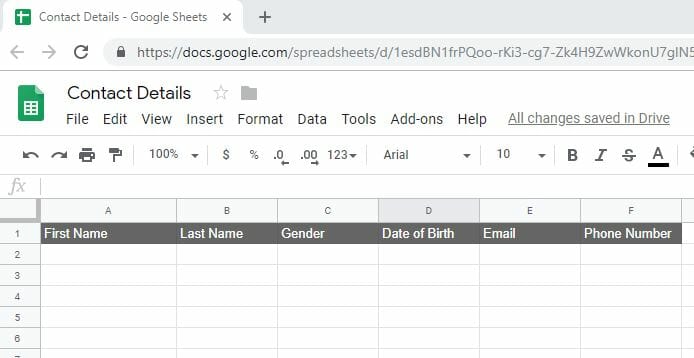
Create a new Google Sheet and add column labels as shown in the below image (we do not use these column names in the program, it is only to identify the data stored underneath)

Step 02. Creating the HTML form
Open the script editor from Tools → Script editor in your Google Sheet.
Then, replace the code in the Code.gs file with the following code.
function doGet(request) {
  return HtmlService.createTemplateFromFile('Index').evaluate();
}
Next, create a new HTML file in the script editor from, File → New → HTML file. name it as “Index“. Then replace the auto-generated code with the following.
<!DOCTYPE html>
<html>
    <head>
        <base target="_top">
        <link rel="stylesheet" href="https://maxcdn.bootstrapcdn.com/bootstrap/4.0.0/css/bootstrap.min.css" integrity="sha384-Gn5384xqQ1aoWXA+058RXPxPg6fy4IWvTNh0E263XmFcJlSAwiGgFAW/dAiS6JXm" crossorigin="anonymous">
    </head>
    <body>
        <div class="container">
            <div class="row">
                <div class="col-6">
                    <form id="myForm" onsubmit="handleFormSubmit(this)">
                        <p class="h4 mb-4 text-center">Contact Details</p>

                        <div class="form-row">
                            <div class="form-group col-md-6">
                                <label for="first_name">First Name</label>
                                <input type="text" class="form-control" id="first_name" name="first_name" placeholder="First Name">
                            </div>
                            <div class="form-group col-md-6">
                                <label for="last_name">Last Name</label>
                                <input type="text" class="form-control" id="last_name" name="last_name" placeholder="Last Name">
                            </div>
                        </div>

                        <div class="form-row">
                            <div class="form-group col-md-6">
                                <p>Gender</p>
                                <div class="form-check form-check-inline">
                                    <input class="form-check-input" type="radio" name="gender" id="male" value="male">
                                    <label class="form-check-label" for="male">Male</label>
                                </div>
                                <div class="form-check form-check-inline">
                                    <input class="form-check-input" type="radio" name="gender" id="female" value="female">
                                    <label class="form-check-label" for="female">Female</label>
                                </div>
                            </div>
                            <div class="form-group col-md-6">
                                <label for="dateOfBirth">Date of Birth</label>
                                <input type="date" class="form-control" id="dateOfBirth" name="dateOfBirth">
                            </div>
                        </div>

                        <div class="form-group">
                            <label for="email">Email</label>
                            <input type="email" class="form-control" id="email" name="email" placeholder="Email">
                        </div>

                        <div class="form-group">
                            <label for="phone">Phone Number</label>
                            <input type="tel" class="form-control" id="phone" name="phone" placeholder="Phone Number">
                        </div>

                        <button type="submit" class="btn btn-primary btn-block">Submit</button>
                    </form>
                    <div id="output"></div>
                </div>
            </div>
        </div>
    </body>
</html>
Now the HTML form is ready, and you can deploy it as a web app by going to Publish → Deploy as a web app… Click the deploy button on the dialog box and copy the link in the next dialog box. Paste the link in the browser, then you can see the form we created.
To add styles to the form, I have loaded Bootstrap CSS via CDN (You can see it in line 5 of the above code).
Step 03. Sending Form Data to Google Sheet
Using google.script.run asynchronous client-side JavaScript API, we can call server-side Apps Script functions from HTML-service pages.
The following JavaScript calls the server-side function processForm once you click the submit button. To add this JavaScript, create a new HTML file and name it ass JavaScript. Then replace the auto-generated code with the following.
<script>
  // Prevent forms from submitting.
  function preventFormSubmit() {
    var forms = document.querySelectorAll('form');
    for (var i = 0; i < forms.length; i++) {
      forms[i].addEventListener('submit', function(event) {
      event.preventDefault();
      });
    }
  }
  window.addEventListener('load', preventFormSubmit);


  function handleFormSubmit(formObject) {
    google.script.run.processForm(formObject);
    document.getElementById("myForm").reset();
  }
</script>
Then add the following code just before the </head> tag of the Index.html file. This code calls the server-side function include() and includes the above JavaScript in the head section of the Index.html file.
<?!= include('JavaScript'); ?>The function preventFormSubmit() in the above JavaScript code change the default form behavior and it prevents the form from redirecting to an inaccurate URL. Once you click the submit button, the above JavaScript calls the server-side function handleFormSubmit() with the form data.
Then add the following two server-side functions to the Code.gs file we created at the beginning and replace the URL with your Google Sheet URL.
/* @Include JavaScript and CSS Files */
function include(filename) {
  return HtmlService.createHtmlOutputFromFile(filename)
      .getContent();
}

/* @Process Form */
function processForm(formObject) {
  var url = "https://docs.google.com/spreadsheets/d/1esdBN1frPQoo-rKi3-cg7-Zk4H9ZwWkonU7glN5p-so/edit#gid=0";
  var ss = SpreadsheetApp.openByUrl(url);
  var ws = ss.getSheetByName("Data");

  ws.appendRow([formObject.first_name,
                formObject.last_name,
                formObject.gender,
                formObject.dateOfBirth,
                formObject.email,
                formObject.phone]);
}
** Important! Replace the URL (line 9) with the URL of your spreadsheet.
Your final code arrangement should look like the one below.
You can see the live form and the datasheet from the following links. Datasheet itself has the code. You can see the code by going to Tools > Script editor.
The Final Code
Step 04. Deploying a script as a web app
Now you can deploy the above code as a web app by going to Publish → Deploy as a web app… Then select New for the project version and click update. Copy the Current web app URL in the next dialog box and click OK. Paste the copied URL in the browser to get the form. You can read more about Deploying a script as a web app from this Google Apps Script Guide.
The following video explains how to copy the above Google Sheets to your drive and to deploy the Apps Script as a web app.
What Next?
In the above code, I have not added form validations. In order to improve the data quality, you need to add data validation for your critical fields. You can add form validation either from the server-side or client-side.
You can also embed this form on a Google Site. Read more about Embedding your web app in Google Sites from this Google Apps Script guide.
If you are looking for a way to create a form for Google Sheets itself, you may read Creating Forms in Google Sheets – Sidebar & Modal Dialog forms.
If you are looking for a more advanced form with all the CRUD operations you may read How to Create an Online Data Entry Form that can Perform CRUD Operations on Google Sheets.


Hi.
I have a question.
I have a form like this and i shared it it some contacts.
I need to know who insert each line of data. It is possible to record username each time script is deployed? How can i do that? Thank you
This is working great!
Thank you so much for this form
One query I have is “How to get a file upload in this form ?”
or
“Any similar form which has CURD facility with upload file function ?”
Please check the following posts
https://www.bpwebs.com/crud-operations-on-google-sheets-with-online-forms/
https://www.bpwebs.com/upload-files-to-google-drive-with-google-apps-script/
The idea of having a html google data input sheet would make my life so much easier!
However, I have been working on this for at least 6 if not 7 hours today. I cannot figure out why my data is not populating into my spreadsheet, Can you help me?
https://docs.google.com/spreadsheets/d/1qlCfi5trGCJQXzlQLUNxXCM-EWq8bmFog5HPJdEFlZs/edit?usp=sharing
Hi everyone,
First of all sorry for my english I’m not very good with grammar.
I’m writing this to answer people having problems with this post implementation.
Problems with preventDefualt():
Be sure that “return HtmlService.createHtmlOutputFromFile(filename).getContent();” is writed in one line so JavaScript file can be included properly.
Problems with write in spreadsheet:
Be sure that Sheet is named ‘Data’ if you’re calling it by name
Google permissions changes so you can’t call easily a spreadsheet with “openByUrl” method
Just use this processForm function:
function processForm(formObject) {
var ss = SpreadsheetApp.getActive();
var ws = ss.getSheetByName(‘Data’);
ws.appendRow([formObject.first_name,
formObject.last_name,
formObject.gender,
formObject.dateOfBirth,
formObject.email,
formObject.phone]);
}
Obviously for get this working you need to call “Apps Scripts” from spreadsheet that you want to form data will be writen
I expect this can help someone, cheers.
Hi,
First of all Thank you for making such a simple tutorial.
I referred your tutorial to accomplish one of my tasks. However my requirement is to provide multiple forms and run GS function based on the form ID. can you help me understand How can I access the form ID in the handleFormSubmit() function?
Thank you
Thank you so much. I have a problem though, my sheet does not update. It is in a shared drive in Google Workspace and is owned by me. Do I need to give the sheet public permissions or get some special authorization?
Hi, I have followed the same method yet my data s not getting inserted into the spreadsheet. Are there any further changes made in the latest version of the app script?
how to add geotaging (latitude, longituide) and timestamp function ?
Thank you very much, very nice and useful for work
An error “datatables warning: table id=data-table – requested unknown parameter ‘2’ for row 0, column 2. for more information about this error, please see http://datatables.net/tn/4” how could i solve it.
Thank you.
I got it running but now I want a button to Reload new data without having to reload the web page please help me.
Excellent post! I’m stuck on something that must be very simple, but it is keeping my version from writing data to the sheet I created. How do you “add column labels” in the Google Sheet?
The prevent default action does not seem to work. If I fill in only one field, the submission goes through.
Thanks a lot.
The best.
very helpul sites for the App scripts, Do you have any example script to implement the dynamic data ( source from the google sheet ) for the web form. Appreciated for your help
amateur here..with a question
the argument “formObject” puzzles me
it’s conjured from nothing as if the html form automagickly creates an object..
is the code that does that
everything else is clear so thanks a bundle!
If you call a server function with a form element as a parameter, the form becomes a single object with field names as keys and field values as values. Read more
thank you
Is there any way to debug what the elements and values of the “formObject” are?
Thanks for tutorial. Great!!.
I have some question.
How to run script triggers on spreadsheet after submitted from web apps?
It mean i want to run script send contacts an email.
Please help.
Thank you in advance.
You can send emails using MailApp.sendEmail.
You can use place it at the end of processForm function.
Thank you very much.
I can send email with using MailApp.sendEmail now.
It work good. (Run script by manual.)
But I still solve the problem, How to run script triggers automatic on spreadsheet after submitted data entry from online web apps? (I have been use google form submitted and then run script triggers automatic on menu bar setting (triggers). It work done. )
Please help again.
Thank you in advance.
How to add a file upload feature
Thank you for the excellent article. I have been trying to do this for weeks. I also wanted to know how I could use a dropdown from bootstrap in the web app. When I use in my web app I am being redirected instead of record the value in the spreadsheet. Any ideas how resolve the issue?