Using the “Form” command, you can easily generate a data entry form in Excel. Data entry forms provide a convenient means to insert, view, update, or delete data. This post will show you how to generate Excel data entry forms and why and when to use them.
Note: The examples in this post have been created with Microsoft 365.
Table of Contents
When you should use Excel Data Entry Forms
- This form is useful when you have more columns that require you to scroll horizontally to add data.
- This form does not contain advanced form features such as dropdown list, radio buttons, list boxes, etc… So, this is useful when you do not need such options
- This form can be used to add data to a maximum of 32 columns. So, it is useful when the number of columns is 32 or below.
- You should have a basic data table. The first row is the column titles and should not have merged cells/ columns.
Why you should use Excel Data Entry Forms
- The data entry form contains a single row of data at a time. So it is not conflicting with other rows. So, it will prevent accidental alteration in other rows.
- It provides a convenient means to enter a row of information into a table without scrolling horizontally.
- The Excel forms allow you to add, edit, find, display, and delete data easily.
- You can display one complete row separately from the others.
- It helps you to avoid most of the mistakes in data entry work.
How to generate a Data Entry Form in Excel
The default installation of Microsoft Excel does not add the Form feature to the main interface. So, you need to add this Form feature to the Ribbon or Quick access toolbar.
Where is the Excel Form command and how to add the form command to Excel Quick Access Toolbar
First, you need to add the Form option to the Ribbon or Quick access toolbar. To do that,
- Go to File > Options > Quick Access Toolbar
- In the “Choose a command from” dropdown list, select “Commands Not in the Ribbon“
- Now, in the command list box, scroll down and double-click on the “Form…” command. Then, you can see the Form command is added to the box on the right side.
- Click OK.
- Now you can see the Form command (form button) has been added to the Quick Access Toolbar.
Create a table to insert data
To generate the Form, you should create the data table first. In your table, the top row should be the column headings. You should not have merged cells in your table.
Convert your data table to an Excel table. This is not necessary, but Excel can easily identify the table if you convert your data table to an Excel table.
To convert your table to an Excel table,
- Select the data table
- Press Ctrl+T and it will open up the Create Table dialog box (You can also use the Insert > Table option).
- Check the checkbox named “My table has headers“
- Click OK
You may also be interested in reading: 10 Benefits of Converting Data into Excel Tables.
Insert Excel Data Entry Form
After you have created the table, you are ready to generate the form.
- Select a cell somewhere in the middle of your table
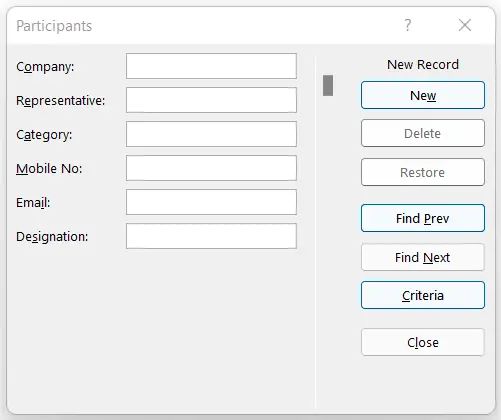
- Click the Form button you added previously in the Quick Access Toolbar and you will see the Data Entry Form popped up.
Whenever you need to open the Data Table, you should follow the above two steps.
How to use Excel Data Entry Form
As explained above, you can easily generate a data entry form without knowledge of VBA. Excel automatically generates text box form controls for each column in your table.

This form provides 7 buttons, namely “New”, “Delete”, “Restore”, “Find Prev”, “Find Next”, “Criteria”, and “Close” to interact with the data table and records.
The functions of the buttons are briefly explained below.
Navigation between form controls
You can use the Tab key to navigate between form controls. This reduces the need to switch from keyboard to mouse or touchpad back and forth unnecessarily. So, use the Tab key to save some time.
Add a new record
Case 01: If you started adding data to a brand new data table and your form fields are empty, just type the data and hit the Enter key to add a new record. This will, add the data to the table and clear the form fields allowing you to add the next record.
Case 02: If you are in the middle of viewing data or have some data in the form field, click the “New” button to clear the form without making any changes to existing data. Then you can start adding new records, as explained above.
View records
In Excel forms, you can navigate through existing data in the table using the “Find Next,” “Find Prev“, and “Criteria” buttons. You can view one record at a time.
Using the “Find Next” and “Find Prev” buttons
- Click anywhere in the table and open the form using the form command you added to the Quick Access Toolbar. Then, the form will open populated with the first record.
- Then you can use the “Find Next” button to move to the next record. Then the form will be populated with the next record in the table.
- Similarly, you use the “Find Prev” button to populate the form with the record just above the current record.
Using the Criteria button
Using this button, you can filter the data based on some criteria. Then the form will be populated with only the records that match the provided criteria.
To do this,
- Click the Criteria button.
- Then type the criteria in the relevant text box as explained below and press Enter key.
- For example, if you want to select only the sales managers, you “Sales Manager” in the designation field.
- And also, if you want to retrieve only the “Sales Managers” from the IT field, you should type “Sales Manager” in the designation text box and “IT” in the Category text box.
- Then, use the “Find Next” and “Find Prev” buttons to navigate through the search results. The form will contain only the records matching the provided criteria.
- Once you click the Criteria button, the button will switch to the Form button. When you click the Form button, it will clear the criteria and the button will switch to the Criteria button.
Update a record
You can also use the Excel Data Entry form to update existing records. To update a record,
- Populate the form with the record to be updated. You can use the record viewing methods explained above to find the correct record.
- Edit the record and hit the Enter key to apply the changes to the data table.
Important !: You can also apply the changes by pressing the New, Criteria, and Close buttons too. If you press these buttons with unwanted changes, those changes will apply to the data table.
So, if you made any changes to existing records and do not want to apply those changes to the table, press the Restore button before pressing the “New”, “Criteria”, or “Close” buttons.
Delete a record
To delete a record,
- Populate the form with the record to be deleted. You can use the record viewing methods explained above to find the correct record.
- Once the form is loaded with the correct data, click the Delete button.
- A dialog box will pop up to get your confirmation for the action, click OK.
Data validation
By creating a data entry form, we expect to reduce the errors in data entry. Data validation plays a crucial role in reducing data entry errors.
The Excel data entry form we created above does not have data validations. However, you can still add data validation rules to the data table. If the user accidentally added invalid data, the Excel throws an error message instead of inserting the invalid data. That way, you can prevent adding invalid data through the form.
To add data validation to the data Excel table,
- Select the table column you need to add the validation. (Hover over the heading of the correct column until you see a black down arrow. Click it once the down arrow appears. It will select the entire column except the column heading.)
- Then, go to Data > Data Validation in the “Data Tools” group
- In the Data Validation dialog box,
- In the Settings tab, you can set the validation rules
- In the Error Alert tab, add the error message and title of the error.
- Click OK.
Wrapping Up
The Data Entry Form is a very old feature in Microsoft Excel. However, Microsoft has removed it from the popular commands. So, most of the users are unaware of this feature.
However, the Excel Data Form can still help you increase productivity in data entry works. And also provides a compact view of the records, making it easy to view and navigate through the records. In this post, we have discussed when, why, and, how you should use the Excel data entry form. The small video demonstrations may help you understand each step easily.
You may also read,
- Creating Forms in Google Sheets – Sidebar & Modal Dialog forms
- How to Create an Online Data Entry Form that can Perform CRUD Operations on Google Sheets
- How to create a Data Entry form in Google Sheets
Enter your email address to subscribe to this blog and receive notifications of new posts by email.

